


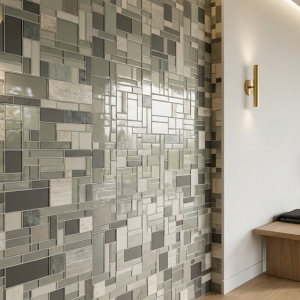








Renovating a bathroom often leads to one specific question. Where do you add personality? Plain tiles are safe. They are easy to clean. But they can feel sterile. Many homeowners choose to add a feature. A splash of color. A textured pattern. This is usually done with mosaic tiles.
But there is a risk. Too much pattern makes a room feel small. It creates visual noise. The trick is to limit the mosaic to a specific area. Then, you need to frame it properly. A focal point without a border looks like a mistake. It looks like you ran out of big tiles. Framing defines the space. It tells the eye where to look.
Here is how to frame a mosaic focal point correctly. This advice applies whether you are tiling a shower niche or a vanity wall.
Choosing the Location
First, pick the right spot. In a mosaic tiles bathroom design, less is usually more. One strong feature is better than three weak ones.
The shower niche is the most common choice. It is protected from direct water flow. It sits at eye level. This makes it perfect for detailed work. Another option is the wall behind the vanity. This acts like a backsplash in a kitchen. It draws attention to the sink area.
Avoid putting mosaics on the main shower floor unless necessary for slope. It creates too much grout to clean. Keep the floor simple. Keep the main walls simple. Let the focal point stand alone. This balance keeps the room feeling open.
Selecting the Border Material
You need a border to separate the mosaic from the main tile. You cannot just stop the mosaic and start the large tile. The edge will look raw. The mesh backing might show. You need a finished edge.
There are three common ways to do this.
Metal Trim
This is the modern standard. Aluminum or stainless steel strips come in various profiles. They protect the edge of the mosaic. They create a clean, straight line. Metal trim is durable. It does not chip. It works well with contemporary designs.
Pencil Tile
This is a traditional option. It is a thin, rounded tile that matches your main wall tile. It creates a softer transition. It works well in classic or traditional bathrooms. The downside is that it can collect dirt on the rounded edge.
Main Tile Return
You can use the large wall tile to frame the mosaic. You cut the large tile to create a border around the mosaic sheet. This creates a seamless look. The grout lines can align if you plan carefully. This method requires more cutting skill.
Choose the material that matches your hardware. If your shower fixtures are brushed nickel, use a matching metal trim. Consistency makes the design feel intentional.
Color and Contrast
How should the frame relate to the mosaic? You have two choices. Blend or contrast.
Blending means the frame color matches the mosaic. This makes the feature feel soft. It merges into the wall. This is good for small bathrooms where you do not want too much visual break.
Contrasting means the frame stands out. A dark frame around a light mosaic creates a picture frame effect. This draws the eye immediately. It works well if the mosaic is subtle. If the mosaic is already busy, keep the frame neutral. A busy mosaic with a busy frame looks chaotic.
Remember that grout color affects this. If you use a contrasting grout in the mosaic, the pattern becomes louder. If you match the grout to the tile, the mosaic looks more like a solid surface. Decide on the grout color before you finalize the frame.
Installation and Leveling
This is where most projects fail. Mosaic tiles are often thinner than standard wall tiles. A glass mosaic might be 4mm thick. A ceramic wall tile might be 8mm thick.
If you install them side by side without planning, you will have a lip. The large tile will stick out. This creates a shadow line. It also creates a ledge for soap scum to build up.
Your installer needs to build up the substrate behind the mosaic. They should add extra mortar or leveling compound. The goal is to make the surface flush. When you run your hand over the transition, you should not feel a step.
This requires skill. Ask your contractor how they plan to handle the thickness difference. If they say they will just use more adhesive, be careful. Thick adhesive beds can sag. Proper substrate preparation is key.
Grout Alignment
Grout lines should make sense. If your main wall tile has vertical grout lines, try to align the mosaic border with them. This creates order.
If the mosaic is inside a niche, the grout lines on the sides should match the wall outside the niche. This is hard to achieve. Mosaics come on sheets. You cannot move individual pieces easily. You have to cut the sheet to fit the grid.
Do not force it if the sizes do not match. It is better to have a solid frame than mismatched lines. A metal trim can hide the mismatch. It breaks the visual connection between the two tile types. This allows you to ignore the grout alignment issue.
Lighting the Feature
A focal point needs light. If you put a beautiful mosaic in a dark corner, no one will see it. In a shower niche, consider adding a waterproof LED strip. This illuminates the texture of the tiles. It makes the glass or stone glow.
For a vanity wall, ensure your sconces or overhead lights hit the feature. Shadows hide detail. You want even illumination. This is part of the planning phase. You need to wire for lights before the tiles go up.
Do not rely on ambient light alone. A dedicated light source makes the feature pop. It turns the tile into art. This is especially important in windowless bathrooms.
Maintenance Reality
A focal point gets attention. That means it gets cleaned. But mosaics have more grout. Grout stains faster than tile.
If your feature is in the shower, it will get soap scum. If it is behind the vanity, it will get toothpaste splatter. You need to clean it regularly. A soft brush works best for the grout lines.
Avoid harsh acids. They can damage the grout and some stone mosaics. Use pH-neutral cleaners. If you used epoxy grout, cleaning is easier. It resists stains better. But the cost is higher. For a small focal point, the extra cost is worth the reduced maintenance.
Sourcing the Materials
Do not buy the mosaic and the frame tile from different places. Colors vary between manufacturers. A white from one brand is rarely the same white from another.
Buy everything from the same supplier. This ensures the tones match. It also helps with batch consistency. You want all the tiles to come from the same production run.
When you visit a supplier, ask about the mosaic tiles bathroom packages. Some shops sell matching trims and tiles together. This saves you from guessing. Bring your main tile sample with you. Hold the mosaic next to it. Check the thickness. Check the color under natural light.
Final Thoughts
Framing a mosaic focal point is about details. It is about the transition. It is about the flush surface. It is about the light.
If you get these things right, the feature adds value. It makes the bathroom feel designed. If you get them wrong, it looks like an afterthought.
Take your time planning the border. Discuss the leveling with your installer. Choose the right light. And keep the rest of the room simple. Let the feature do the work. A well-framed mosaic is a permanent upgrade. It withstands trends. It withstands wear. And it gives your bathroom a identity without overwhelming the space.