


The Ultimate Guide to Professional Lighting: Mastering the Art of Illumination
Lighting is the invisible brush that paints a photograph or video into existence. For beginners stepping into a controlled environment for the first time, the array of stands, cables, and modifiers can feel overwhelming. However, professional lighting is less about owning the most expensive gear and more about understanding how light behaves. Whether you are setting up a home space or visiting a professional studio in lahore, mastering the fundamentals of illumination is what separates a snapshot from a cinematic masterpiece.
The primary goal of studio lighting is to create depth, texture, and mood. In a natural outdoor setting, you are at the mercy of the sun. In a studio, you are the creator. You decide where the shadows fall, how soft the skin looks, and how much the subject stands out from the background. This guide breaks down the essential concepts every creator needs to know to harness the power of light effectively.
Understanding the Quality of Light: Hard vs. Soft
Before touching a single light stand, a creator must understand the "quality" of light. This doesn't refer to how expensive the light is, but rather how the shadows appear on the subject. Hard light comes from a small light source relative to the subject, such as the bare bulb of a flash or the midday sun. It produces sharp, distinct shadows and high contrast. This is often used for edgy, dramatic portraits or to highlight textures in high-fashion photography.
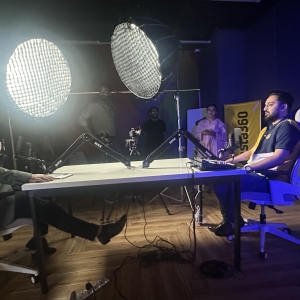
Soft light, conversely, is produced by a large light source. By using modifiers like softboxes or umbrellas, you effectively increase the size of the light source. This "wraps" the light around the subject, resulting in a gentle transition between highlights and shadows. Soft light is the industry standard for beauty, interviews, and corporate headshots because it is incredibly flattering on human skin. When you visit a high-end podcast studio, you will often notice large diffusion panels or softboxes used specifically to ensure the hosts look professional and approachable on camera.
The Foundation: The Three-Point Lighting Setup
The three-point lighting setup is the "gold standard" of studio production. It is a formula that has been used for decades in Hollywood and professional photography because it provides a reliable balance of light and shadow.
The Key Light
The Key Light is your primary light source. It is usually placed at a 45-degree angle to the subject and slightly above eye level. This light defines the overall exposure and shape of the subject. Its placement is crucial because it dictates where the primary shadows will fall.
The Fill Light
If you only used a Key Light, one side of your subject’s face would be in deep shadow. The Fill Light is placed on the opposite side of the Key Light, usually at a lower intensity. Its job is to "fill" in those shadows just enough to retain detail without making the face look flat. The ratio between your Key and Fill determines the "mood" of your shot—a subtle fill creates drama, while a bright fill creates a "clean" commercial look.
The Backlight (Rim Light)
The final piece of the puzzle is the Backlight, often called a Rim Light or Hair Light. This light is placed behind the subject, pointing toward the back of their head or shoulders. It creates a thin outline of light that separates the subject from the background. This is the secret to achieving that "3D" professional look that makes a subject pop off the screen.
Choosing the Right Equipment for Your Vision
Not all lights are created equal. Depending on whether you are shooting stills or video, you will choose between Continuous Lighting and Strobe Lighting. Continuous lights stay on all the time, which is essential for videography and helpful for beginners because "what you see is what you get." Modern LED panels have made continuous lighting more affordable and portable than ever before.
Strobes, or flashes, are the preference for photographers. They emit a powerful burst of light that is much brighter than continuous LEDs, allowing photographers to use lower ISO settings and faster shutter speeds. This ensures maximum image quality and sharpness. When searching for a studio near me, it is always wise to check if the facility provides both options, as having the flexibility to switch between video and photo lighting can save a production significant time.
The Magic of Light Modifiers
A light source is only as good as the modifier attached to it. Modifiers allow you to shape, direct, and soften the light.
-
Softboxes: These are rectangular or octagonal covers that diffuse light for even illumination.
-
Reflectors: Often overlooked, a simple white or silver reflector can act as a "passive" Fill Light by bouncing the Key Light back onto the subject.
Color Temperature and White Balance
In the world of professional studio lighting, color is measured in Kelvins (K). Light isn't just "white"; it can be warm (orange) or cool (blue). Standard daylight is approximately 5600K, while traditional tungsten indoor bulbs are around 3200K.
Mixing color temperatures can lead to muddy-looking footage or photos where skin tones look sickly. Professional studios use "bi-color" LEDs or gels to ensure all lights in a scene match. This consistency is vital for maintaining the E-E-A-T (Experience, Expertise, Authoritativeness, and Trustworthiness) of your visual content. High-quality production values signal to your audience that you are an expert in your field who pays attention to detail.
Practical Tips for Your First Session
When you finally step into the studio, start with one light at a time. Beginners often make the mistake of turning on every light they have at once, which makes it impossible to see what each light is actually doing. Turn on your Key Light first, adjust its position until the shadows look right, and only then add your Fill and Backlight.
Pay close attention to the eyes. A "catchlight"—the small reflection of the light source in the subject’s pupils—is what brings a portrait to life. Without a catchlight, eyes can look dull and "dead." Simply adjusting the height of your softbox can create that sparkle that makes a subject look vibrant and engaged.
Why Professional Spaces Matter
While DIY setups are a great way to learn, there is no substitute for the controlled environment of a professional studio. In a dedicated space, you don't have to fight with sunlight changing throughout the day or limited room to move your lights back. Professional studios are designed with high ceilings and neutral walls to give you total creative control.
At Delenzo Studio, we understand that lighting is the heartbeat of every project. Whether you are a photographer looking for the perfect strobe setup or a content creator needing a quiet, perfectly lit space for a video, the environment is tailored to support your vision. The right lighting doesn't just make a subject look better; it tells a story, evokes emotion, and builds a brand. By mastering these basics and practicing in a professional setting, you empower yourself to create content that truly resonates with your audience.
Would you like me to help you draft a specific equipment list tailored to your next project's budget?